Beyond the Web: How Python is Powering Low-Level System Simulation
The Surprising Trend of Simulating Hardware with High-Level Python
In the world of software development, Python has firmly established itself as a titan of high-level programming. Renowned for its clean syntax, dynamic typing, and extensive standard library, it’s the go-to language for web development, data science, machine learning, and automation. This focus on abstraction and developer productivity often places it conceptually far from the “bare metal” world of CPU architecture and low-level systems. However, a fascinating trend is emerging in the community, a piece of python news that challenges these traditional boundaries: developers are increasingly using Python to build simulators for low-level hardware, from simple 8-bit CPUs to complex system-on-a-chip (SoC) environments.
This article dives deep into this exciting development. We’ll explore why a high-level, interpreted language like Python is becoming a tool of choice for a task traditionally dominated by C and C++. We will walk through the practical construction of a simplified CPU, demonstrating key Python features that make this possible. Finally, we’ll discuss the performance implications, best practices, and the broader role Python is playing in the future of systems engineering and hardware verification. This isn’t just a novelty; it’s a testament to Python’s incredible versatility and a sign of its expanding influence into new, technically demanding domains.
Section 1: Why Simulate Low-Level Systems in Python?
The choice to simulate a CPU or any hardware component in Python might seem counterintuitive at first. Performance is paramount in simulation, and Python is not known for its raw speed. However, the benefits often outweigh the performance trade-offs, especially during the design, education, and verification phases.
The Power of High-Level Abstraction for Rapid Prototyping
Building a hardware simulator is fundamentally about modeling a state machine. You have registers, memory, and a set of rules (the instruction set) for transitioning between states. Python excels at this kind of modeling.
- Readability and Expressiveness: Python’s clear syntax allows the logic of the CPU’s fetch-decode-execute cycle to be expressed in a way that is easy to read, understand, and debug. This is invaluable when dealing with the intricate logic of instruction sets.
- Flexible Data Structures: Python’s built-in data structures are perfect for modeling hardware components. A list or
bytearraycan represent RAM, a dictionary can hold the CPU’s registers, and classes can elegantly encapsulate components like the ALU (Arithmetic Logic Unit) or memory management unit. - No Manual Memory Management: Developers can focus on the logic of the simulation without worrying about memory allocation, pointers, and segmentation faults that can plague C/C++ development, significantly speeding up the initial prototyping phase.
An Unparalleled Educational and Debugging Tool
For students of computer architecture or engineers learning a new instruction set, building a simulator is a powerful learning exercise. Python lowers the barrier to entry, allowing learners to focus on the architectural concepts rather than the complexities of a low-level language.
Furthermore, Python’s interactive nature makes debugging a breeze. The ability to use a REPL (Read-Eval-Print Loop) or a debugger like pdb to pause the simulation, inspect the state of every register and memory location, and step through the execution cycle instruction-by-instruction is a massive advantage. You can write a small program in your custom assembly language, load it into your simulated memory, and watch it execute in real-time, providing instant feedback and insight.
Leveraging Python’s Rich Ecosystem
A simulation doesn’t exist in a vacuum. Often, you want to visualize memory layouts, graph performance metrics, or create a simple user interface to interact with the simulated machine. This is where Python’s “batteries-included” philosophy shines. With libraries like Matplotlib, you can plot register values over time. With Pygame, you could create a simple display and keyboard interface for your virtual machine. With Flask, you could even expose your simulator’s state via a web API. This ability to easily integrate with a vast ecosystem of tools transforms a simple simulator into a comprehensive analysis and development environment.
Section 2: A Practical Walkthrough: Building an 8-Bit CPU Simulator

To make these concepts concrete, let’s design and implement a simple, hypothetical 8-bit CPU we’ll call “Py-8”. This hands-on example will showcase how Python’s features map directly to hardware concepts.
Defining the Py-8 Architecture
Our CPU will be very simple. It will have:
- 256 bytes of RAM: Modeled as a Python list or bytearray.
- Three 8-bit registers:
R1,R2for general purpose use, andACC(the accumulator). - An 8-bit Program Counter (PC): To keep track of the address of the next instruction.
- A simple instruction set: Each instruction will be 2 bytes long. The first byte is the opcode, and the second is the operand (a value or memory address).
The Core CPU Class and Memory
We can start by creating a class to represent our CPU. This class will encapsulate the registers, the program counter, and a reference to the memory it operates on.
class Py8CPU:
    """
    A simulator for a simple, hypothetical 8-bit CPU.
    """
    def __init__(self):
        # 256 bytes of memory, initialized to zero
        self.memory = bytearray(256)

        # Registers are stored in a dictionary for easy access
        self.registers = {
            'R1': 0,
            'R2': 0,
            'ACC': 0,
        }

        # Program Counter
        self.pc = 0

        # A flag to halt execution
        self.is_halted = False

    def load_program(self, program_bytes):
        """Loads a program (list of bytes) into memory."""
        # Ensure program fits in memory
        if len(program_bytes) > len(self.memory):
            raise ValueError("Program is too large for memory.")

        # Copy program bytes into the start of memory
        self.memory[0:len(program_bytes)] = program_bytes

    def __repr__(self):
        return (f"Py8CPU(PC={self.pc}, R1={self.registers['R1']}, "
                f"R2={self.registers['R2']}, ACC={self.registers['ACC']}, "
                f"Halted={self.is_halted})")
The Fetch-Decode-Execute Cycle
The heart of any CPU is the fetch-decode-execute cycle. This is the main loop that drives the simulation.
- Fetch: Read the instruction byte pointed to by the Program Counter (PC).
- Decode: Determine what the instruction means.
- Execute: Perform the action required by the instruction.
This loop continues until a HALT instruction is encountered.
# Opcodes for our simple instruction set
OP_HALT = 0x00      # Halt execution
OP_LOAD_CONST = 0x01 # Load a constant value into a register
OP_LOAD_MEM = 0x02   # Load a value from a memory address into a register
OP_ADD = 0x03       # Add the values of R1 and R2, store in ACC
OP_STORE_MEM = 0x04  # Store the ACC value to a memory address

class Py8CPU:
    # ... (previous __init__, load_program, etc.)

    def run(self):
        """Executes the program loaded in memory."""
        while not self.is_halted:
            # 1. Fetch
            opcode = self.memory[self.pc]

            # 2. Decode & 3. Execute
            self.execute_instruction(opcode)

    def execute_instruction(self, opcode):
        """Decodes and executes a single instruction."""
        if opcode == OP_HALT:
            self.is_halted = True
            print("Execution Halted.")
            return

        # Most instructions are 2 bytes: opcode, operand
        # We increment PC after fetching each part
        self.pc += 1
        operand1 = self.memory[self.pc]

        if opcode == OP_LOAD_CONST:
            # operand1 = register_code, operand2 = value
            self.pc += 1
            operand2 = self.memory[self.pc]

            if operand1 == 0x01: # R1
                self.registers['R1'] = operand2
            elif operand1 == 0x02: # R2
                self.registers['R2'] = operand2

        elif opcode == OP_ADD:
            # No operands needed from memory for this simple ADD
            # Note: Python's integers don't overflow, so we must simulate it
            result = self.registers['R1'] + self.registers['R2']
            self.registers['ACC'] = result & 0xFF # Use bitwise AND to keep it 8-bit

        elif opcode == OP_STORE_MEM:
            # operand1 = memory address
            mem_addr = operand1
            self.memory[mem_addr] = self.registers['ACC']

        else:
            raise ValueError(f"Unknown opcode: {hex(opcode)} at address {self.pc-1}")

        # Move to the next instruction
        self.pc += 1
To test this, we can write a tiny program to add two numbers (5 and 10) and store the result in memory location 200.
# Program: Add 5 and 10, store result at address 200
# LOAD_CONST R1, 5
# LOAD_CONST R2, 10
# ADD
# STORE_MEM 200
# HALT

program = [
    OP_LOAD_CONST, 0x01, 5,    # Load 5 into R1
    OP_LOAD_CONST, 0x02, 10,   # Load 10 into R2
    OP_ADD,                    # Add R1 and R2, result in ACC
    OP_STORE_MEM, 200,         # Store ACC into memory[200]
    OP_HALT
]

# Let's run it!
cpu = Py8CPU()
cpu.load_program(bytearray(program))
cpu.run()

print(cpu)
print(f"Value at memory address 200: {cpu.memory[200]}")

# Expected output:
# Execution Halted.
# Py8CPU(PC=9, R1=5, R2=10, ACC=15, Halted=True)
# Value at memory address 200: 15
This simple example demonstrates the core principles. We’ve successfully modeled a CPU’s state and behavior using basic Python classes, dictionaries, and control flow. The code is readable, and the logic of the machine is transparent.
Section 3: Performance, Pitfalls, and Best Practices
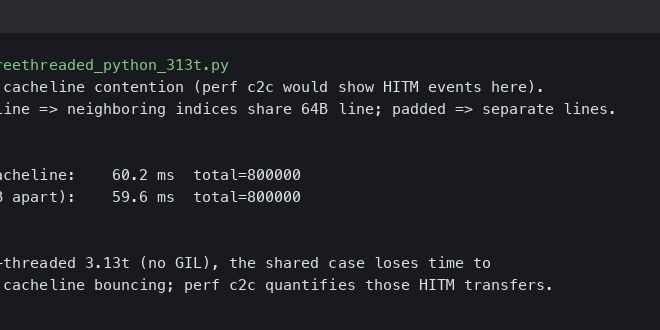
While our simulator works, it’s not optimized. For educational purposes, this is fine. But for more serious simulations, performance becomes a key concern. This is a hot topic in python news and development circles whenever Python is used for CPU-intensive tasks.
Addressing the Performance Question
Python’s interpreter adds significant overhead to every operation. A loop that executes millions of times to simulate a CPU running at a few MHz will be noticeably slow.
- Interpreter Overhead: Each Python instruction (like `self.pc += 1`) involves many underlying C function calls in the CPython interpreter for type checking, reference counting, and execution.
- Dynamic Typing: Looking up a register in a dictionary (`self.registers[‘R1’]`) is slower than accessing a struct member in C.
Optimization Strategies

Several techniques can dramatically improve the performance of a Python-based simulator.
- Use a Dispatch Table: The long `if/elif/else` chain in our `execute_instruction` method is inefficient. The interpreter has to check each condition sequentially. A better approach is a “dispatch table” using a dictionary that maps opcodes to handler methods.
- Prefer `bytearray`: We correctly used `bytearray` for memory. It is more memory-efficient and often faster for raw byte manipulation than a list of integers.
- Consider JIT Compilers: A Just-In-Time (JIT) compiler like PyPy can often provide a massive, “drop-in” performance boost. PyPy can analyze the main execution loop, identify hot spots, and compile them down to highly optimized machine code, often bringing performance closer to that of statically compiled languages.
Here is how we could refactor our `execute_instruction` method to use a dispatch table:
class Py8CPU_Optimized(Py8CPU):
    def __init__(self):
        super().__init__()
        # Map opcodes to their handler methods
        self.opcode_handlers = {
            OP_HALT: self._op_halt,
            OP_LOAD_CONST: self._op_load_const,
            OP_ADD: self._op_add,
            OP_STORE_MEM: self._op_store_mem,
        }

    def execute_instruction(self, opcode):
        handler = self.opcode_handlers.get(opcode)
        if handler:
            handler()
        else:
            raise ValueError(f"Unknown opcode: {hex(opcode)} at address {self.pc}")

    # Each instruction becomes its own method
    def _op_halt(self):
        self.is_halted = True
        self.pc += 1

    def _op_load_const(self):
        reg_code = self.memory[self.pc + 1]
        value = self.memory[self.pc + 2]
        if reg_code == 0x01: self.registers['R1'] = value
        elif reg_code == 0x02: self.registers['R2'] = value
        self.pc += 3

    def _op_add(self):
        result = self.registers['R1'] + self.registers['R2']
        self.registers['ACC'] = result & 0xFF
        self.pc += 1

    def _op_store_mem(self):
        mem_addr = self.memory[self.pc + 1]
        self.memory[mem_addr] = self.registers['ACC']
        self.pc += 2
Common Pitfalls
- Forgetting to Simulate Hardware Constraints: Python’s integers have arbitrary precision. A common mistake is forgetting to simulate overflow. As shown with `result & 0xFF`, you must explicitly enforce the bit-width of your simulated hardware.
- Incorrectly Managing the Program Counter: The PC must be managed meticulously. Forgetting to increment it, or incrementing it by the wrong amount for variable-length instructions, is a frequent source of bugs.
- State Management: Ensure that instructions modify the CPU state in the correct, atomic order. An instruction should read all its inputs before writing its outputs to avoid race conditions with its own operands.
Section 4: The Bigger Picture and Recommendations
The trend of using Python for low-level simulation extends far beyond hobbyist CPU projects. It’s making a significant impact in professional hardware design and verification.
Python as a “Glue Language” for Hardware Verification
In the semiconductor industry, tools like Cocotb (Coroutine Co-simulation Test Bench) allow engineers to write testbenches for their VHDL or Verilog hardware designs entirely in Python. The Python script runs alongside a traditional hardware simulator, feeding it inputs and checking its outputs.

This approach combines the best of both worlds:
- The hardware design itself is implemented in a performant Hardware Description Language (HDL).
- The complex test logic, stimulus generation, and result checking are done in Python, leveraging its power for data generation, file I/O, and integration with other systems.
This is a major piece of python news for the electrical engineering community, as it dramatically increases productivity in the verification process, which is often the most time-consuming part of chip design.
Recommendations: When to Use Python
So, when should you reach for Python to build a simulator?
Use Python for:
- Education and Learning: It is arguably the best language for learning computer architecture from the ground up.
- Rapid Prototyping: When you have a new CPU architecture or instruction set idea, you can model and test it in Python in a fraction of the time it would take in C++ or SystemVerilog.
- High-Level System Modeling: For simulating the interaction between multiple components (CPU, memory, peripherals) where the internal, clock-cycle-accurate details of each component are less important than their interactions.
- Test Automation and Verification: As a control plane or testbench for orchestrating tests on other, more performant simulators or even real hardware.
Consider a Lower-Level Language (C++, Rust) when:
- Performance is Critical: If you need to build an emulator that can run complex software (like an operating system or a video game) at near-native speeds.
- Cycle-Accurate Simulation is Required: When you need to model the precise timing of every signal within the CPU on every clock cycle, the overhead of Python becomes too great.
Conclusion: Python’s Expanding Frontier
The use of Python for simulating low-level systems is a powerful reminder that a language’s utility is not defined by its raw performance but by its ability to solve problems effectively. For a wide range of tasks in hardware design, verification, and education, Python’s strengths—readability, rapid development, and a rich ecosystem—provide overwhelming advantages. While it won’t replace C++ for building high-performance commercial emulators, it has carved out an essential niche as a prototyping, modeling, and verification tool.
This trend is more than just a curiosity; it’s significant python news that highlights the language’s ongoing evolution. It demonstrates the creativity of the Python community in pushing the language into new and challenging territories. As Python continues to grow, we can expect to see it bridge the gap between high-level software and low-level hardware in even more innovative ways, solidifying its status as one of the most versatile programming languages in the world.